Running PyTorch models in OpenFOAM - basic setup and examples
- Why PyTorch
- Docker image with OpenFOAM and PyTorch
- Local installation of LibTorch
- Setting up Visual Studio Code
- Compiling examples using wmake and CMake
- Additional links to resources
- Summary
Incorporating data-driven workflows in computational fluid dynamics (CFD) is currently a hot topic, and it will undoubtedly gain even more traction over the months and years to come. The main idea is to use available datasets to make simulation-based workflows faster or more accurate. In the field of machine learning (ML) applied to CFD, deep learning (DL) algorithms allow us to tackle high-dimensional problems more effectively and promise significant progress in fields like turbulence modeling, flow control, or shape optimization. If you found your way to this article, chances are high that you don’t need to be convinced of the potential of ML/DL + CFD. So let’s skip the prose and get started with the nitty-gritty of this article: how to set up PyTorch to run DL models in OpenFOAM apps.
Why PyTorch
Why should you consider using PyTorch instead of Tensorflow/Keras? The short answer is because PyTorch is easy and fast. Both PyTorch and Tensorflow provide C++ and Python frontend APIs. However, at the time of writing, my arguments in favor of PyTorch when it comes to incorporating DL models in OpenFOAM are:
- it is easy to set up the C++ libraries because there are pre-compiled packages (libtorch)
- it is easy to move data and models between the Python and C++ interface thanks to TorchScript
- the C++ API is closely aligned with its Python counterpart; once you know how to do something in one frontend, you have at least an idea what to look for in the other frontend
Of course, these arguments only capture my current impression, and DL frameworks are improving at lightning speed. If you had a different experience with Tensorflow or PyTorch, let me know! I would love to see workflows that make it as easy as possible for users and developers to switch between both frameworks according to their needs.
Docker image with OpenFOAM and PyTorch
If you have read some of my previous blog posts, you know that I am a fan of software containers as a means to make workflows reproducible and shareable. If you’re not much of a Docker user, you should still read this section because it also explains some details needed for local installations. So here is how to create a Docker image based on:
- Ubuntu 20.04 LTS
- OpenFOAM-v2006; pre-compiled Debian/Ubuntu package by ESI-OpenCFD
- PyTorch 1.6; pre-compiled C++ API package (LibTorch)
The Dockerfile and instructions on how to build and use an image can be found in this repository (I try to keep it up to date with the current versions of PyTorch and OpenFOAM). Here, I only want to focus on some of the details.
# some commands to install required packages
# ...
# install OpenFOAM via Debian package
ARG FOAM_PATH=/usr/lib/openfoam/openfoam2006
RUN apt-get update && apt-get install --no-install-recommends -y \
    openfoam2006-default && \
    echo ". ${FOAM_PATH}/etc/bashrc" >> /etc/bash.bashrc && \
    sed -i "s/-std=c++11/-std=c++14/g" ${FOAM_PATH}/wmake/rules/General/Gcc/c++ && \
    sed -i "s/-Wold-style-cast/-Wno-old-style-cast/g" ${FOAM_PATH}/wmake/rules/General/Gcc/c++


## download and extract the PyTorch C++ libraries (libtorch)
RUN wget -q -O libtorch.zip https://download.pytorch.org/libtorch/cpu/libtorch-cxx11-abi-shared-with-deps-1.6.0%2Bcpu.zip && \
    unzip libtorch.zip -d opt/ && \
    rm *.zip

## set libtorch enironment variable
ENV TORCH_LIBRARIES /opt/libtorch
The Dockerfile contains two modifications to the OpenFOAM compiler flags. First, the C++ standard is set from C++11 to C++14. This change is necessary because otherwise, PyTorch C++ code will not compile. It would be proper to re-compile OpenFOAM after changing the standard, however, there are only minor differences between both standards, and so far I haven’t had any trouble without recompiling the sources. Still, you can also change the standard and re-compile OpenFOAM with C++14 without any trouble (at least the core library; I didn’t test any third-party packages).
The second modification switches off old-style-cast warnings being displayed when compiling PyTorch code. This change is only for convenience and helps to spot truly important warning and error messages more easily.
“Installing” LibTorch is as easy as downloading and extracting a zip file. The shared object and header files are located under /opt/libtorch on the image. Moreover, it makes your life easier if you define an environment variable pointing to the LibTorch directory (e.g. to switch between Docker and local installation, to switch between different library versions, or to set up your code editor).
Local installation of LibTorch
The local installation of LibTorch is very similar to the Docker recipe. First, go to the PyTorch website and select the C++ API package as indicated in the picture below. Important: use the download link containing -abi-shared-with-deps- (cxx11 ABI). Then extract the archive to a location of your choice.
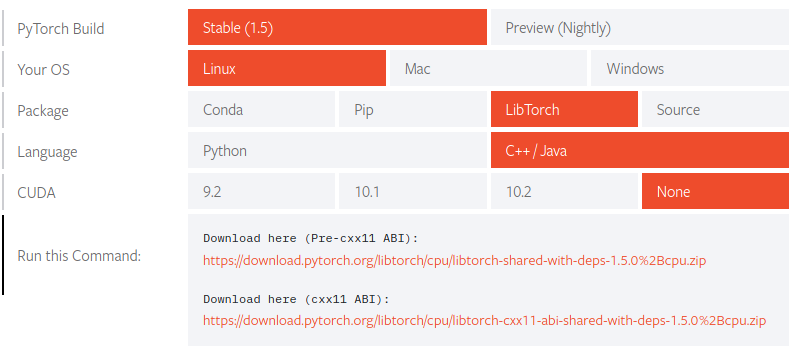 |
|---|
| Selection to download libtorch without GPU support. |
As in the Dockerfile, I recommend to set up an environment variable pointing to the LibTorch installation, e.g., add export TORCH_LIBRARIES=/path/to/libtorch to your ~/.bashrc file.
Setting up Visual Studio Code
Powerful code editors can make your life much easier when learning to use a large library with little documentation. Over the last couple of months, I have started using Visual Studio Code (vscode) for more and more of my projects. The main reason for me is the easy setup for a variety of different programming languages and tools (e.g., support for CMake and Docker is available). There are extensions for almost everything, and they are easy to install and manage. With very little effort, you can configure linting, code-completion, automatic code-formatting, or quickly jump to the definition of functions and classes. Setting up vscode for your C++/libtorch project requires only a couple of steps.
Installing vscode
On the download page of vscode, you find plenty of options to get vscode. There are .deb and .rpm packages for the most popular Linux distributions, but also installers for Windows and MacOS. For C++ projects, you also want to install the official C/C++ extension. After staring vscode (simply type code . in the command line), open the extension manager by pressing Crtl+Shift+X, search for C/C++, and click on install.
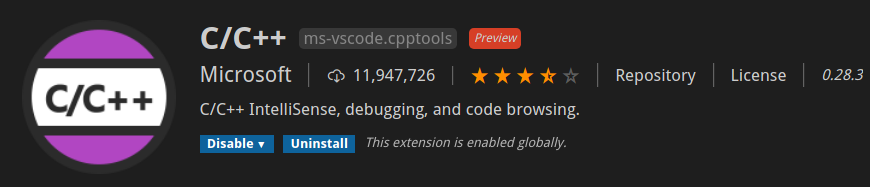 |
|---|
| C/C++ extension for vscode. |
Configuring Intellisense
If you open up one of the PyTorch C++ examples in the repository with vscode, you will notice that Intellisense (the vscode engine doing all the magic in the background) is not able to find the torch.h header file. To fix this issue, some of the Intellisense settings have to be changed. In vscode, open the command palette by pressing Ctrl+Shift+P, search for C/C++, and select C/C++: Edit Configurations (JSON) as in the image below.
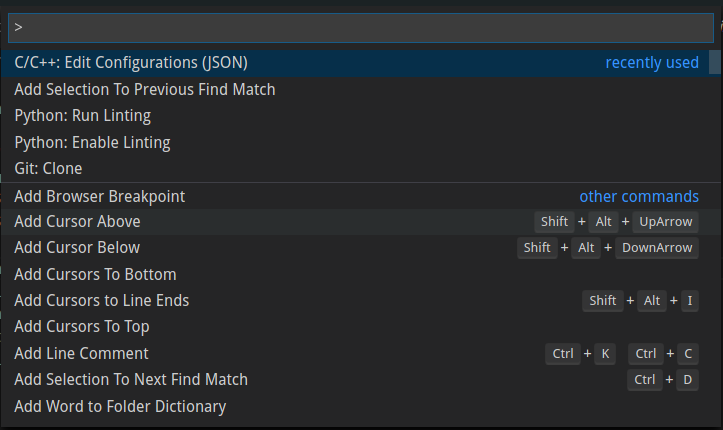 |
|---|
| Opening C/C++ configurations in vscode. |
Assuming that you have defined an environment variable called TORCH_LIBRARIES as described above, the following settings allow Intellisense to find the LibTorch header files. Tip: you may also want to add the path to the OpenFOAM sources when programming with components from both libraries. If the OpenFOAM environment variables were available in the shell in which you opened vscode, add "${FOAM_SRC}/**" to the includePath section of the Intellisense configuration file. Otherwise, it is also possible to add the full path to the OpenFOAM source folder.
{
    "configurations": [
        {
            "name": "Linux",
            "includePath": [
                "${workspaceFolder}/**",
                "${TORCH_LIBRARIES}/**",
                "${FOAM_SRC}/**"
            ],
            "defines": [],
            "compilerPath": "/usr/bin/g++",
            "cStandard": "c11",
            "cppStandard": "c++14",
            "intelliSenseMode": "gcc-x64"
        }
    ],
    "version": 4
}
Compiling examples using wmake and CMake
By default, LibTorch applications are compiled using CMake, and dependencies are defined in CMakeLists.txt files. In contrast, OpenFOAM applications are typically compiled using wmake. Therefore, you are confronted with the following dilemma: you can either try to figure out how to compile OpenFOAM apps with CMake or you learn how to build LibTorch programs with wmake. I decided some time ago for the latter approach and haven’t changed my workflow since then. This repository currently contains two examples and instructions on how to run them:
tensorCreation: basics of PyTorch tensors and Autograd; compiled using wmakesimpleMLP: implementation of a simple neural network (multilayer perceptron - MLP); compiled using CMake
Instead of checking all the CMake files contained in LibTorch, I found it much easier to simply look at the final compile command created by CMake and then to add PyTorch-related options to the wmake options file. The simpleMLP example in the repository mentioned above contains the implementation of a simple neural network in LibTorch and a CMake configuration file that enables verbose output during the compilation. The output of make should look similar to the content of the code box below.
# step 1: using cmake to create a makefile
cmake ..
# step 2: compiling the application using make
make
# verbose output
...
[ 50%] Building CXX object CMakeFiles/simpleMLP.dir/simpleMLP.C.o
/usr/bin/c++  -DAT_PARALLEL_OPENMP=1 -isystem /opt/libtorch/include -isystem /opt/libtorch/include/torch/csrc/api/include  -D_GLIBCXX_USE_CXX11_ABI=1 -Wall -Wextra -Wno-unused-parameter -Wno-missing-field-initializers -Wno-write-strings -Wno-unknown-pragmas -Wno-missing-braces -fopenmp -std=gnu++14 -o CMakeFiles/simpleMLP.dir/simpleMLP.C.o -c /home/andre/pyTorchCmake/simpleMLP.C
[100%] Linking CXX executable simpleMLP
/usr/bin/cmake -E cmake_link_script CMakeFiles/simpleMLP.dir/link.txt --verbose=1
/usr/bin/c++    -rdynamic CMakeFiles/simpleMLP.dir/simpleMLP.C.o  -o pyTorchOnes  -Wl,-rpath,/opt/libtorch/lib /opt/libtorch/lib/libtorch.so /opt/libtorch/lib/libc10.so -Wl,--no-as-needed,/opt/libtorch/lib/libtorch_cpu.so -Wl,--as-needed /opt/libtorch/lib/libc10.so -lpthread -Wl,--no-as-needed,/opt/libtorch/lib/libtorch.so -Wl,--as-needed
make[2]: Leaving directory '/home/andre/simpleMLP/build'
[100%] Built target simpleMLP
...
Now you can add the paths to header and shared object files to the wmake options and simplify the paths using the TORCH_LIBRARIES environment variable. The following box shows the options file of the tensorCreation example, compiled with wmake. Note that the last three lines are optional.
EXE_INC = \
-I$(TORCH_LIBRARIES)/include \
-I$(TORCH_LIBRARIES)/include/torch/csrc/api/include

EXE_LIBS = \
-Wl,-rpath,$(TORCH_LIBRARIES)/lib $(TORCH_LIBRARIES)/lib/libtorch.so $(TORCH_LIBRARIES)/lib/libc10.so \
-Wl,--no-as-needed,$(TORCH_LIBRARIES)/lib/libtorch_cpu.so \
-Wl,--as-needed $(TORCH_LIBRARIES)/lib/libc10.so \
-Wl,--no-as-needed,$(TORCH_LIBRARIES)/lib/libtorch.so
Additional links to resources
- PyTorch Python API and C++ API documentation
- Autograd in the PyTorch C++ frontend
- plethora of PyTorch C++ examples by Omkar Prabhu
- creating a Docker image with OpenFOAM and PyTorch
- examples for ML applied to CFD problems
Summary
Getting started in a new, huge field like ML and DL can be hard for CFD people, but I strongly believe it is worth the trouble. I hope that this article saves you some time and maybe motivates you to give ML+CFD a try in case you’re undecided. Should you have follow-up questions or suggestions for future articles related to this topic, let me know! Finally, I would like to thank Chiara Pesci for her early feedback on this blog post and Tomislav Maric for our ongoing discussions about OpenFOAM and PyTorch, which have significantly influenced and improved the content of this post.
Cheers, Andre