When compiling a new high-level application or utility that will be shipped as a container, ideally, you want to start from a base image that comes as close as possible to the build-environment you need to compile your application. For example, if you’re going to create and build a custom OpenFOAM® solver, it makes perfect sense to start with the OpenFOAM Docker image as a base. You may install additional third-party libraries, copy your sources to the image, and compile. This workflow is really convenient since it allows, for example, to compile your application against a variety of OpenFOAM versions or flavors at lighting speed while keeping all dependencies nicely separated. One disadvantage, however, is the quickly increasing storage demand since every newly created image contains both the build-environment and the application. Moreover, sending the image over the network will take longer and cause significantly more traffic. Of course, there is an established way to overcome these disadvantages called multi-stage builds, and this article tells you how to apply it to OpenFOAM applications.
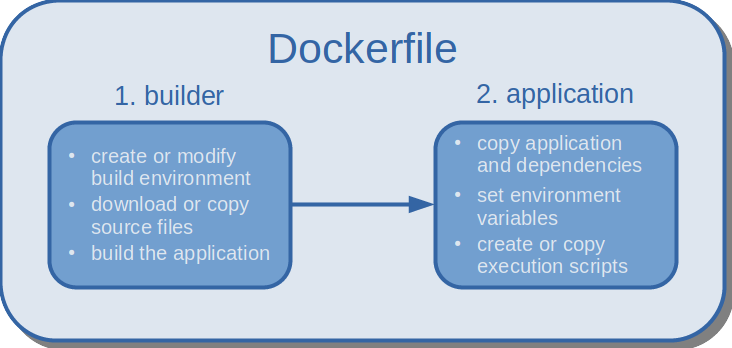
The idea behind multi-stage builds is simple: first, you prepare one or more build-environments with all dependencies (typically called builder(s)), then you build your application, and finally, you extract only what is really needed from the builder and discard the rest. The simplest multi-stage build is a two-stage build as depicted in the image below. However, you could also merge applications from multiple different builders into one final image, or you could combine different builders to create a new builder. The first scenario may be relevant to merge several binaries needed to run a simulation into a single image (e. g. third-party meshing tool + custom OpenFOAM solver + third-party post-processing tool). The latter scenario may occur if OpenFOAM is combined with another custom library to build the final app. In the early days of Docker, users would define individual Dockerfiles for each step in the build process, and write wrapper scripts to execute them in order. Since the introduction of multi-stage builds, Docker handles the execution and copy processes for the user, and the entire build can be defined in a single Dockerfile.
Multi-stage build with two stages: in the first stage, the environment is set up and the application is compiled; in the second stage, the compiled application and its dependencies are isolated. |
Let’s start with the probably simplest app we can build in a multi-stage process as outlined before: hello_world.cpp
. If you want to follow along:
mkdir hello_world
cd hello_world
touch hello_world.cpp
hello_world.cpp
#include <iostream>
using std::cout;
int main(){
cout << "Hello World - multi-stage edition\n";
return 0;
}
To build the app, we start with the official Ubuntu 18.04 Docker image, update the list of available software packages, and install a C++ compiler. Note that the ~120MB Docker image of Ubuntu is not comparable to the richly packaged desktop version you may use on your workstation, so you’ll probably have to install more dependencies than you’re used to. The actual compile command to build the program follows in line 5. Compiling the app concludes the first stage.
In the second stage, we start with an empty Docker image (basically FROM
scratch) and copy only the binary called hello from the first stage over to the final image. The possibility to name different stages makes it easy to write comprehensible Dockerfiles. In the example below, our base image is simply called builder. This name is then used in the second stage to run the COPY
command. By default, the hello
program is executed whenever we run a container.
# first stage
FROM ubuntu:18.04 AS builder
RUN apt-get update && apt-get install -y g++
COPY hello_world.cpp /
RUN g++ -static -o hello hello_world.cpp
# second stage
FROM scratch
COPY --from=builder hello /
CMD ["/hello"]
To build and run the hello world multi-stage version,
touch Dockerfile
,docker build -t hello_world:multi_stage .
docker run hello_world:multi_stage
# output ...
Hello World - multi-stage edition
I hope you’ll agree at this point that Docker multi-stage builds enable us to create streamlined build processes. The same overall two-step structure can be applied to build OpenFOAM apps, too. However, there are some technicalities that require a couple of intermediate steps to create a runnable and isolated binary. Therefore, we’ll first take a look at how dummyFoam is built in a single-stage process.
dummyFoam
consists only of the basic app structure that the foamNewApp
utility creates. The app does nothing more than setting up a root-case and creating a (run)time object. In case you want to follow along, I have set up two Github repositories to make your life easier:
git clone https://github.com/AndreWeiner/of_app_isolation.git
cd of_app_isolation
git clone https://github.com/AndreWeiner/dummyFoam.git
With the commands above, we have downloaded one repository into another. The commands issued later on require precisely this folder structure. The first repository contains the Dockerfiles for single and multi-stage builds. The second one comprises a version-controlled form of dummyFoam. Let’s now have a look at the single-stage build.
FROM openfoamplus/of_v1912_centos73
# copy app source code to base image
COPY dummyFoam /opt/OpenFOAM/OpenFOAM-v1912/applications/solvers/dummyFoam
# change working directory
WORKDIR /opt/OpenFOAM/OpenFOAM-v1912/applications/solvers/dummyFoam
# source environment variables, compile, and create execution script
RUN source /opt/OpenFOAM/OpenFOAM-v1912/etc/bashrc && \
wmake && \
mkdir /case && \
echo "source /opt/OpenFOAM/OpenFOAM-v1912/etc/bashrc &> /dev/null; dummyFoam -case /case" > /runDummyFoam.sh
We start with version 1912 of the OpenFOAM-plus release as a base image. The image comes with all dependencies needed to build dummyFoam
. Next, we copy the app sources to the image and make the app folder our work-directory. The RUN
command sources the OpenFOAM environment variables, builds the app using wmake
, and creates a new folder in the root directory. The case folder serves as a mount point to attach simulation cases.
Commands to build the dummyFoam image and to create a container are provided in the code box below. We use the latest commit on the master branch of the dummyFoam
repository (the default state after cloning the repository). One could also checkout another branch before copying the sources and building the image. To track the branch/commit used, it is good practice to tag the image with the commit hash (or at least a unique portion of it).
# build the image
docker build -t andreweiner/dummy_foam:$(git --git-dir dummyFoam/.git log -1 --format=%h) -f Dockerfile.single .
# create a container
docker container run -it andreweiner/dummy_foam_single:06ff344 /bin/bash
# now we are inside the container
# let's see where the dummyFoam binary file is located
which dummyFoam
# output ...
/root/OpenFOAM/-v1912/platforms/linux64GccDPInt32Opt/bin/dummyFoam
With the latter two commands in the code box above, we can see where in the image the dummyFoam
binary is located. However, this time it is not as easy as copying the binary over to the second stage. A little twist I didn’t comment on earlier in the hello_world.cpp
example is the flag -static
. Even though the hello world program is relatively simple, it already has quite some dependencies on other libraries. An obvious example is iostream
from the C++ standard library. But the standard library links against other C libraries which will be therefore also needed in the hello program. If one of these dependencies is missing in the second stage, the linker (a tool provided by the operating system to handle library dependencies) will complain and crash as soon as we try to execute the binary. So why did it work in the first example? The answer is that the flag -static
tells the compiler to create a static version of the program. A static program is one that does not dynamically load any other libraries at runtime. In other words, the compiler packages all the dependencies into a single executable binary file. The reason why not every program is compiled statically is the subsequent massive redundancy of binary code. Each and every C++ program, for example, would very likely contain the entire C++ standard library.
Coming back to the compilation of dummyFoam
, unfortunately, it is not as easy as adding a flag to the wmake
options. We would have to tinker around with the base image, and presumably create a new one. Here, we follow another path. In theory, we just have to find all the libraries dummyFoam loads at runtime and copy them over to the second stage together with the dummyFoam
binary itself. This workflow may sound cumbersome, but, luckily, it can be automated to a large extent as you’ll see in the next section.
ldd is a tool that invokes the (dynamic) linker and allows us to trace dynamic library dependencies. The output of ldd
is formatted as shared_library.so => /path/to/shared_library.so (address in memory)
(learn more). dummyFoam
loads several OpenFOAM-specific and some system libraries, as can be seen in the code box below. Note that you have to be inside the container created after the single-stage build to invoke to command in line 1 of the code box.
ldd $(which dummyFoam)
# output ...
linux-vdso.so.1 => (0x00007fff811f7000)
libfiniteVolume.so => /opt/OpenFOAM/OpenFOAM-v1912/platforms/linux64GccDPInt32Opt/lib/libfiniteVolume.so (0x00007f1220154000)
libmeshTools.so => /opt/OpenFOAM/OpenFOAM-v1912/platforms/linux64GccDPInt32Opt/lib/libmeshTools.so (0x00007f121f930000)
libOpenFOAM.so => /opt/OpenFOAM/OpenFOAM-v1912/platforms/linux64GccDPInt32Opt/lib/libOpenFOAM.so (0x00007f121ecc1000)
libdl.so.2 => /lib64/libdl.so.2 (0x00007f121eabd000)
libstdc++.so.6 => /lib64/libstdc++.so.6 (0x00007f121e7b4000)
...
What we actually need from the ldd
-output are the paths to all shared object libraries (*.so
files). To extract the path from each line, we pipe the output to cut
, split the line at every whitespace, and keep only the third element/field. The output of cut can be piped again to xargs
, which converts the line-wise output of cut
into a single line containing all paths (basically, an argument list that can be used by yet another program).
ldd $(which dummyFoam) | cut -d" " -f3
# output ...
/opt/OpenFOAM/OpenFOAM-v1912/platforms/linux64GccDPInt32Opt/lib/libfiniteVolume.so
/opt/OpenFOAM/OpenFOAM-v1912/platforms/linux64GccDPInt32Opt/lib/libmeshTools.so
/opt/OpenFOAM/OpenFOAM-v1912/platforms/linux64GccDPInt32Opt/lib/libOpenFOAM.so
/lib64/libdl.so.2
/lib64/libstdc++.so.6
...
ldd $(which dummyFoam) | cut -d" " -f3 | xargs
# output ...
/opt/OpenFOAM/OpenFOAM-v1912/platforms/linux64GccDPInt32Opt/lib/libfiniteVolume.so /opt/OpenFOAM/OpenFOAM-v1912/platforms/linux64GccDPInt32Opt/lib/libmeshTools.so /opt/OpenFOAM/OpenFOAM-v1912/platforms/linux64GccDPInt32Opt/lib/libOpenFOAM.so /lib64/libdl.so.2 /lib64/libstdc++.so.6 ...
Did this single-line command seem too easy to work? It sometimes is because there is another stumbling block you may encounter. Many operating systems, like Ubuntu, allow having multiple versions of the same library. To manage these dependencies internally, there is usually a symbolic link pointing to the default version of the library. One example in the case of dummyFoam is the C++ standard library. If we inspect the path returned by ldd using ls -al
, we find that /lib64/libstdc++.so.6
is actually pointing to the specific version libstdc++.so.6.0.19
in the same directory. The tracing of ldd
does not follow symbolic links, so we have to keep that in mind when copying the library files. You’ll read in the next section to overcome this issue.
ls -al /lib64/libstdc++.so.6
# output ...
lrwxrwxrwx 1 root root 19 Jun 5 2017 /lib64/libstdc++.so.6 -> libstdc++.so.6.0.19
Finally, we are ready for the multi-stage build of dummyFoam
! In the builder stage, we package the libraries required by dummyFoam
into a tar-archive. In the tar
command, it is essential to add the --dereference
flag. This option tells tar
to follow symbolic links and to archive the actual file and not the link pointing to it. In the last step of the first stage, another file not captured by the cut
command is added to the archive, and a second archive containing OpenFOAM configuration files is created.
# step 1: build application using base image with build environment
FROM openfoamplus/of_v1912_centos73 AS builder
COPY dummyFoam /opt/OpenFOAM/OpenFOAM-v1912/applications/solvers/dummyFoam
WORKDIR /opt/OpenFOAM/OpenFOAM-v1912/applications/solvers/dummyFoam
RUN source /opt/OpenFOAM/OpenFOAM-v1912/etc/bashrc && \
wmake && \
ldd $(which dummyFoam) | cut -d" " -f3 | xargs tar --dereference -cf libs.tar && \
tar --dereference -rvf libs.tar /lib64/ld-linux-x86-64.so.2 && \
tar -cf etc.tar /opt/OpenFOAM/OpenFOAM-v1912/etc
The base image for the second stage is Alpine, a minimalistic operating system specifically designed for Docker images. Alpine has a package manager and enables us to install basic command-line tools like bash
and tar
. Next, we copy the dummyFoam
binary, the required dynamic libraries, and the configuration files from the builder and extract the archives. Note that the absolute paths of all files will be the same in the second stage. The remainder of the Dockerfile configures environment variables and creates an execution script that runs dummyFoam
in the /case
folder (similar to the single-stage build).
# step 2: isolate application and dependencies
FROM alpine:latest
RUN apk add --no-cache bash tar
COPY --from=builder /opt/OpenFOAM/OpenFOAM-v1912/applications/solvers/dummyFoam/libs.tar \
/root/OpenFOAM/-v1912/platforms/linux64GccDPInt32Opt/bin/dummyFoam \
/opt/OpenFOAM/OpenFOAM-v1912/applications/solvers/dummyFoam/etc.tar \
/
RUN tar -xf libs.tar && \
tar -xf etc.tar && \
rm *.tar && \
sed -i '/projectDir=\"\$HOME\/OpenFOAM\/OpenFOAM-\$WM_PROJECT_VERSION\"/c\projectDir=\"\/opt\/OpenFOAM\/OpenFOAM-\$WM_PROJECT_VERSION\"' /opt/OpenFOAM/OpenFOAM-v1912/etc/bashrc && \
mkdir case && \
echo "source /opt/OpenFOAM/OpenFOAM-v1912/etc/bashrc &> /dev/null; /dummyFoam -case /case" > runDummyFoam.sh
ENV LD_LIBRARY_PATH=\
lib:\
lib64:\
/opt/OpenFOAM/OpenFOAM-v1912/platforms/linux64GccDPInt32Opt/lib:\
/opt/OpenFOAM/ThirdParty-v1912/platforms/linux64Gcc/openmpi-1.10.4/lib64/lib:\
/opt/OpenFOAM/OpenFOAM-v1912/platforms/linux64GccDPInt32Opt/lib/openmpi-1.10.4:\
/opt/OpenFOAM/ThirdParty-v1912/platforms/linux64Gcc/openmpi-1.10.4/lib64
To perform the multi-stage build, run docker build -t andreweiner/dummy_foam:$(git --git-dir dummyFoam/.git log -1 --format=%h)
. If the image build succeeds, you should be presented with a teeny-tiny but executable version of the custom solver. You can test the image as follows:
cd
into any valid OpenFOAM test case; if you have a local installation, you may run cd $FOAM_TUTORIALS/basic/laplacianFoam/flange/
dummyFoam
in the test case using docker container run -it -v"$PWD:/case" andreweiner/dummy_foam:06ff344 /bin/bash /runDummyFoam.sh > log.dummyFoam
The solver output in the log-file should look as follows:
...
Create time
ExecutionTime = 0 s ClockTime = 0 s
End
To conclude this somewhat lengthy post, let’s see how much space we actually gained thanks to the multi-stage build. To get the precise image size in bytes, run docker image inspect IMAGE_ID --format=''
. When sending an image over the network, e. g. to Dockerhub, the image is typically compressed using gzip
. So, the important numbers are the size of the image on our system and the size of the compressed archive. To save the single and multi-stage build outcomes as compressed archives, check out the code box below.
## OpenFOAM base image
docker save openfoamplus/of_v1912_centos73:latest | gzip > of_base.tar.gz
du -h of_base.tar.gz
# output ...
653M of_base.tar.gz
## isolated dummyFoam app
docker save andreweiner/dummy_foam:06ff344 | gzip > dummy_foam.tar.gz
du -h dummy_foam.tar.gz
# output ...
42M dummy_foam.tar.gz
The table below displays the final numbers. The difference between the base image and the result of the single-stage build is less than 1 MB. The multi-stage build yields an image that is about 15 times smaller than the one resulting in the single-stage build. Another interesting idea is that adding more apps to the multi-stage build would presumably lead to a marginal increase of the final image size since other apps access mostly the same shared objects libraries as dummyFoam does.
version | image size | compressed |
---|---|---|
OpenFOAM-v1912 | 2481 MB | 653 MB |
dummyFoam + OpenFOAM-v1912 | 2481 MB | 653 MB |
dummyFoam | 160 MB | 42 MB |
I hope you found some useful code snippets or ideas while reading the post.
Cheers, Andre
]]>Incorporating data-driven workflows in computational fluid dynamics (CFD) is currently a hot topic, and it will undoubtedly gain even more traction over the months and years to come. The main idea is to use available datasets to make simulation-based workflows faster or more accurate. In the field of machine learning (ML) applied to CFD, deep learning (DL) algorithms allow us to tackle high-dimensional problems more effectively and promise significant progress in fields like turbulence modeling, flow control, or shape optimization. If you found your way to this article, chances are high that you don’t need to be convinced of the potential of ML/DL + CFD. So let’s skip the prose and get started with the nitty-gritty of this article: how to set up PyTorch to run DL models in OpenFOAM apps.
Why should you consider using PyTorch instead of Tensorflow/Keras? The short answer is because PyTorch is easy and fast. Both PyTorch and Tensorflow provide C++ and Python frontend APIs. However, at the time of writing, my arguments in favor of PyTorch when it comes to incorporating DL models in OpenFOAM are:
Of course, these arguments only capture my current impression, and DL frameworks are improving at lightning speed. If you had a different experience with Tensorflow or PyTorch, let me know! I would love to see workflows that make it as easy as possible for users and developers to switch between both frameworks according to their needs.
If you have read some of my previous blog posts, you know that I am a fan of software containers as a means to make workflows reproducible and shareable. If you’re not much of a Docker user, you should still read this section because it also explains some details needed for local installations. So here is how to create a Docker image based on:
The Dockerfile and instructions on how to build and use an image can be found in this repository (I try to keep it up to date with the current versions of PyTorch and OpenFOAM). Here, I only want to focus on some of the details.
# some commands to install required packages
# ...
# install OpenFOAM via Debian package
ARG FOAM_PATH=/usr/lib/openfoam/openfoam2006
RUN apt-get update && apt-get install --no-install-recommends -y \
openfoam2006-default && \
echo ". ${FOAM_PATH}/etc/bashrc" >> /etc/bash.bashrc && \
sed -i "s/-std=c++11/-std=c++14/g" ${FOAM_PATH}/wmake/rules/General/Gcc/c++ && \
sed -i "s/-Wold-style-cast/-Wno-old-style-cast/g" ${FOAM_PATH}/wmake/rules/General/Gcc/c++
## download and extract the PyTorch C++ libraries (libtorch)
RUN wget -q -O libtorch.zip https://download.pytorch.org/libtorch/cpu/libtorch-cxx11-abi-shared-with-deps-1.6.0%2Bcpu.zip && \
unzip libtorch.zip -d opt/ && \
rm *.zip
## set libtorch enironment variable
ENV TORCH_LIBRARIES /opt/libtorch
The Dockerfile contains two modifications to the OpenFOAM compiler flags. First, the C++ standard is set from C++11 to C++14. This change is necessary because otherwise, PyTorch C++ code will not compile. It would be proper to re-compile OpenFOAM after changing the standard, however, there are only minor differences between both standards, and so far I haven’t had any trouble without recompiling the sources. Still, you can also change the standard and re-compile OpenFOAM with C++14 without any trouble (at least the core library; I didn’t test any third-party packages).
The second modification switches off old-style-cast warnings being displayed when compiling PyTorch code. This change is only for convenience and helps to spot truly important warning and error messages more easily.
“Installing” LibTorch is as easy as downloading and extracting a zip file. The shared object and header files are located under /opt/libtorch
on the image. Moreover, it makes your life easier if you define an environment variable pointing to the LibTorch directory (e.g. to switch between Docker and local installation, to switch between different library versions, or to set up your code editor).
The local installation of LibTorch is very similar to the Docker recipe. First, go to the PyTorch website and select the C++ API package as indicated in the picture below. Important: use the download link containing -abi-shared-with-deps- (cxx11 ABI). Then extract the archive to a location of your choice.
Selection to download libtorch without GPU support. |
As in the Dockerfile, I recommend to set up an environment variable pointing to the LibTorch installation, e.g., add export TORCH_LIBRARIES=/path/to/libtorch
to your ~/.bashrc
file.
Powerful code editors can make your life much easier when learning to use a large library with little documentation. Over the last couple of months, I have started using Visual Studio Code (vscode) for more and more of my projects. The main reason for me is the easy setup for a variety of different programming languages and tools (e.g., support for CMake and Docker is available). There are extensions for almost everything, and they are easy to install and manage. With very little effort, you can configure linting, code-completion, automatic code-formatting, or quickly jump to the definition of functions and classes. Setting up vscode for your C++/libtorch project requires only a couple of steps.
On the download page of vscode, you find plenty of options to get vscode. There are .deb
and .rpm
packages for the most popular Linux distributions, but also installers for Windows and MacOS. For C++ projects, you also want to install the official C/C++ extension. After staring vscode (simply type code .
in the command line), open the extension manager by pressing Crtl+Shift+X, search for C/C++, and click on install.
C/C++ extension for vscode. |
If you open up one of the PyTorch C++ examples in the repository with vscode, you will notice that Intellisense (the vscode engine doing all the magic in the background) is not able to find the torch.h header file. To fix this issue, some of the Intellisense settings have to be changed. In vscode, open the command palette by pressing Ctrl+Shift+P, search for C/C++, and select C/C++: Edit Configurations (JSON) as in the image below.
Opening C/C++ configurations in vscode. |
Assuming that you have defined an environment variable called TORCH_LIBRARIES
as described above, the following settings allow Intellisense to find the LibTorch header files. Tip: you may also want to add the path to the OpenFOAM sources when programming with components from both libraries. If the OpenFOAM environment variables were available in the shell in which you opened vscode, add "${FOAM_SRC}/**"
to the includePath
section of the Intellisense configuration file. Otherwise, it is also possible to add the full path to the OpenFOAM source folder.
{
"configurations": [
{
"name": "Linux",
"includePath": [
"${workspaceFolder}/**",
"${TORCH_LIBRARIES}/**",
"${FOAM_SRC}/**"
],
"defines": [],
"compilerPath": "/usr/bin/g++",
"cStandard": "c11",
"cppStandard": "c++14",
"intelliSenseMode": "gcc-x64"
}
],
"version": 4
}
By default, LibTorch applications are compiled using CMake, and dependencies are defined in CMakeLists.txt
files. In contrast, OpenFOAM applications are typically compiled using wmake
. Therefore, you are confronted with the following dilemma: you can either try to figure out how to compile OpenFOAM apps with CMake or you learn how to build LibTorch programs with wmake
. I decided some time ago for the latter approach and haven’t changed my workflow since then. This repository currently contains two examples and instructions on how to run them:
tensorCreation
: basics of PyTorch tensors and Autograd; compiled using wmakesimpleMLP
: implementation of a simple neural network (multilayer perceptron - MLP); compiled using CMakeInstead of checking all the CMake files contained in LibTorch, I found it much easier to simply look at the final compile command created by CMake and then to add PyTorch-related options to the wmake
options file. The simpleMLP example in the repository mentioned above contains the implementation of a simple neural network in LibTorch and a CMake configuration file that enables verbose output during the compilation. The output of make should look similar to the content of the code box below.
# step 1: using cmake to create a makefile
cmake ..
# step 2: compiling the application using make
make
# verbose output
...
[ 50%] Building CXX object CMakeFiles/simpleMLP.dir/simpleMLP.C.o
/usr/bin/c++ -DAT_PARALLEL_OPENMP=1 -isystem /opt/libtorch/include -isystem /opt/libtorch/include/torch/csrc/api/include -D_GLIBCXX_USE_CXX11_ABI=1 -Wall -Wextra -Wno-unused-parameter -Wno-missing-field-initializers -Wno-write-strings -Wno-unknown-pragmas -Wno-missing-braces -fopenmp -std=gnu++14 -o CMakeFiles/simpleMLP.dir/simpleMLP.C.o -c /home/andre/pyTorchCmake/simpleMLP.C
[100%] Linking CXX executable simpleMLP
/usr/bin/cmake -E cmake_link_script CMakeFiles/simpleMLP.dir/link.txt --verbose=1
/usr/bin/c++ -rdynamic CMakeFiles/simpleMLP.dir/simpleMLP.C.o -o pyTorchOnes -Wl,-rpath,/opt/libtorch/lib /opt/libtorch/lib/libtorch.so /opt/libtorch/lib/libc10.so -Wl,--no-as-needed,/opt/libtorch/lib/libtorch_cpu.so -Wl,--as-needed /opt/libtorch/lib/libc10.so -lpthread -Wl,--no-as-needed,/opt/libtorch/lib/libtorch.so -Wl,--as-needed
make[2]: Leaving directory '/home/andre/simpleMLP/build'
[100%] Built target simpleMLP
...
Now you can add the paths to header and shared object files to the wmake
options and simplify the paths using the TORCH_LIBRARIES
environment variable. The following box shows the options file of the tensorCreation example, compiled with wmake
. Note that the last three lines are optional.
EXE_INC = \
-I$(TORCH_LIBRARIES)/include \
-I$(TORCH_LIBRARIES)/include/torch/csrc/api/include
EXE_LIBS = \
-Wl,-rpath,$(TORCH_LIBRARIES)/lib $(TORCH_LIBRARIES)/lib/libtorch.so $(TORCH_LIBRARIES)/lib/libc10.so \
-Wl,--no-as-needed,$(TORCH_LIBRARIES)/lib/libtorch_cpu.so \
-Wl,--as-needed $(TORCH_LIBRARIES)/lib/libc10.so \
-Wl,--no-as-needed,$(TORCH_LIBRARIES)/lib/libtorch.so
Getting started in a new, huge field like ML and DL can be hard for CFD people, but I strongly believe it is worth the trouble. I hope that this article saves you some time and maybe motivates you to give ML+CFD a try in case you’re undecided. Should you have follow-up questions or suggestions for future articles related to this topic, let me know! Finally, I would like to thank Chiara Pesci for her early feedback on this blog post and Tomislav Maric for our ongoing discussions about OpenFOAM and PyTorch, which have significantly influenced and improved the content of this post.
Cheers, Andre
]]>This article is all about
The quickest way to get a running OpenFOAM installation on any Linux distribution (or even Mac and Windows) is probably via a Docker image. In case you have never heard of Docker, and you are wondering why you should bother to use it, Robin Knowles from CFD Engine wrote a fantastic article entitled The complete guide to Docker & OpenFOAM, which I really recommend to read before continuing with this post. If you are not in the mood to read another article, here is why you should care about Docker in a nutshell:
If you followed the installation instructions provided on the ESI OpenFOAM website, you installed Docker and executed two scripts, namely installOpenFOAM, and startOpenFOAM. Afterward, you were magically presented with a running OpenFOAM installation without having had to worry about any dependencies besides Docker. And there is more: in the isolated container environment, you still have the same username as on the Linux host and use the same credentials to run sudo commands. There is also a fully-fledged version of paraFoam available. You may be wondering why this should be a big deal?! Well, Docker is great for creating standardized, isolated, and minimalistic environments. Isolation means that Docker only uses few core components of the host system’s Linux kernel (Cgroups, Namespaces, etc. - learn more), but it doesn’t depend on or interact with any other applications, libraries, or configuration files of the host. To work in a Docker container feels a bit like working on a remote server, with the difference being only that this remote server is an isolated fraction of your workstation. Still, with the OpenFOAM-plus workflow, the OpenFOAM container integrates seamlessly into your system, and you can run simulations just as well as with the native installation. But how and when does the mapping of username, password, or permissions happen? And how does it become possible to access your simulation data if created in an isolated environment? It all happens with the execution of two short scripts. Understanding these scripts will enable you to modify them according to your needs. If you are curious to learn more, read on.
Let’s start with the first script that was executed: installOpenFOAM
. The name suggests that this script installs OpenFOAM on your computer, but as you will learn in the next paragraphs, there is no classical installation process when working with images/containers. A more suitable name might be initOpenFOAMContainer
or even better runOpenFOAMContainer
, but I guess such naming could confuse users new to Docker and containerization. The script may be divided into two logical parts: first, some useful environment variables are defined, and then the Docker run command is executed.
username="$USER"
user="$(id -u)"
home="${1:-$HOME}"
imageName="openfoamplus/of_v1812_centos73"
containerName="of_v1812"
displayVar="$DISPLAY"
Line 1 and 2 define variables for username and user id. The username will be your login name as in the command line prompt, e. g. username@workstation:~$
. The id is an integer value associated with the user, most likely 1001. The next line is of great importance because it defines where (in which path) you will interact with the OpenFOAM container. The syntax of the right-hand-side works as follows: ${defined_path:-default_path}
. The default path is simply your home directory HOME
. The default path is used if no other valid path was given as the first command-line argument to the installOpenFOAM
script. To change the default path, one would execute ./installOpenFOAM /absolute/alternative/path
. The imageName is the name of the OpenFOAM image hosted on Dockerhub. The part of the image name before the front slash corresponds to the Dockerhub user, here openfoamplus. The second part gives more information about the image. For example, the present image is built on CentOS 7.3 and contains version 1812 of OpenFOAM-plus. Last but not least, there is the DISPLAY
variable, which tells an application with a graphical user interface (GUI) where to display the interface. On my laptop, the value of DISPLAY
is simply :0
(zero), which is my primary (and only) screen. Remember, Docker containers are a bit like remote servers, so you have to provide some additional information to use GUI applications. With all the information gathered up to this point, we are ready to move on to the actual container creation.
The syntax to create and execute a container is docker run [options] IMAGE [command] [args]
(read more). The image name is stored in the variable imageName
and appears only in the twelfth line of the command in the code box below. Every item between docker run and ${imageName} starting with -
or --
is an option. The command to be executed after the container was created is /bin/bash, which is why you are presented with a command-line prompt when starting the OpenFOAM container. Bash is run with the -rcfile
argument to execute additional commands from the file specified thereafter (line 13). The content of setImage.sh
is shown in the last code box of this article for completeness.
1
2
3
4
5
6
7
8
9
10
11
12
13
docker run -it -d --name ${containerName} --user=${user} \
-e USER=${username} \
-e QT_X11_NO_MITSHM=1 \
-e DISPLAY=${displayVar} \
-e QT_XKB_CONFIG_ROOT=/usr/share/X11/xkb \
--workdir="${home}" \
--volume="${home}:${home}" \
--volume="/etc/group:/etc/group:ro" \
--volume="/etc/passwd:/etc/passwd:ro" \
--volume="/etc/shadow:/etc/shadow:ro" \
--volume="/etc/sudoers.d:/etc/sudoers.d:ro" \
-v=/tmp/.X11-unix:/tmp/.X11-unix ${imageName} \
/bin/bash --rcfile /opt/OpenFOAM/setImage_v1812.sh
Let’s take a closer look at all the container options displayed above because this is where the magic happens.
option | description |
---|---|
-i or --interactive |
keeps the standard input open even if you detach from the container, e.g., if you close the terminal |
-t or --tty |
allocates a virtual console to interact with the container |
-d or --detach |
allows running a container in the background; the container will not stop after you exit from the container |
--name |
sets a container name |
-u or --user |
creates an additional user within the container; the default user is root |
-e or --env |
sets environment variables in the container |
-w or --workdir |
sets the working directory inside the container, e.g., the default directory after attaching (logging in) to the container |
-v or --volume |
binds a source from the host to the container; such a source might be a file, a directory, or a Docker volume |
The first interesting option is the --user
flag, which is used to create a new user inside the container with the same id as the user creating the container. Additionally, in line 2, the -e
option sets the corresponding username. More environment variables are set in lines 3-5 to enable a GUI (mainly ParaView) to be forwarded to the host system. In line 6 the working directory is set to home
. The home directory will be the same as on the host system since we first mapped the user to the container (unless a different directory was specified). The syntax to bind volumes to the container is --volume path_on_host:path_in_container:options
. The last argument is optional, for example, to make a file or directory read-only with the ro
option. The first and most important directory-mount happens in line 7, where the home directory of the container is bound to the host’s home. If you use the FOAM_RUN
directory to run test cases, then all the solver/utility output will be accessible from the home directory of the host. Likewise, data can be made accessible to the container by moving it to the home directory. After mounting home, there are three more single files and two folders that are bound to the container:
/etc/group
file contains a list of groups and their members/etc/passwd
contains further user attributes like id or password/etc/shadow
is a file with the same content as /etc/passwd
but only root has read access (this is some safety feature of modern Linux systems)sudoers.d
folder sometimes contains sudoers (users with root privileges) information that has to stay unchanged whenever the system is upgraded.X11-unix
folder contains an endpoint (a Unix socket) for the Xserver to communicate with clients (applications like ParaView)The installOpenFOAM
will be only run once to create the OpenFOAM container. startOpenFOAM
is the script to execute whenever you need to login to the container. The first line in the scripts grants the container access to the Xserver of the host (to draw GUIs). After that follow two common Docker commands. docker start CONTAINER_NAME
will start the container in case it was stopped, for example, after rebooting the host system. It is important to note, however, that the container must exist. Finally, an interactive bash shell is executed in the running container using the Docker exec
command: docker exec [options] CONTAINER_NAME command [args]
.
xhost +local:of_v1812
docker start of_v1812
docker exec -it of_v1812 /bin/bash -rcfile /opt/OpenFOAM/setImage_v1812.sh
The content of the rcfile
loaded when you execute bash in the container is included in the code box below. First, all the OpenFOAM-specific variables and commands are sourced (made available). After that, some third-party binaries and libraries are added to PATH
and LD_LIBRARY_PATH
to have them system-wide available for execution or for compiling new applications (in the container). The last exported variable is again a dependency of paraFoam
, which is built with Qt.
source /opt/OpenFOAM/OpenFOAM-v1812/etc/bashrc
export LD_LIBRARY_PATH=$WM_THIRD_PARTY_DIR/platforms/linux64Gcc/ParaView-5.6.0/lib/mesa:$LD_LIBRARY_PATH
export LD_LIBRARY_PATH=$WM_THIRD_PARTY_DIR/platforms/linux64Gcc/ParaView-5.6.0/lib/paraview-5.6/plugins:$LD_LIBRARY_PATH
export LD_LIBRARY_PATH=$WM_THIRD_PARTY_DIR/platforms/linux64Gcc/qt-5.9.0/lib:$LD_LIBRARY_PATH
export LD_LIBRARY_PATH=$WM_THIRD_PARTY_DIR/platforms/linux64/zlib-1.2.11/lib:$LD_LIBRARY_PATH
export PATH=$WM_THIRD_PARTY_DIR/platforms/linux64Gcc/qt-5.9.0/bin:$PATH
export QT_PLUGIN_PATH=$WM_THIRD_PARTY_DIR/platforms/linux64Gcc/qt-5.9.0/plugins
If you have your own modified version of OpenFOAM or some solver/utility you have written, here are approaches to preserve and ship your work using Docker:
I will describe each of these approaches in more detail in follow-up articles.
Cheers, Andre
]]>Tutorials are an interactive way of transferring knowledge. They are a kind of recipe that provides you with the necessary steps to complete a particular task. The maintainers of OpenFOAM deliver an extensive collection of tutorials together with the library. For OpenFOAM users, the supplied case setups are the most useful information provided for free. Reading this post to the end will enable you to run all these tutorials, avoiding some pitfalls.
Tutorials are essential because to start your project in most cases you will:
The tutorial collection contains a variety of different case setups. In the following, you will learn three different ways to run OpenFOAM tutorials. To get started, open a terminal window and copy the tutorial collection into your run directory.
cp -r $FOAM_TUTORIALS $FOAM_RUN
The lid-driven cavity flow is a common test case for validation. It is also one of the cases thoroughly explained in the OpenFOAM tutorial guide (section 2.1). The way how you create and run simulations in OpenFOAM may seem a bit strange to users who come from a Microsoft-Windows environment or who are used to have a GUI. Instead, solvers, utilities, or scripts in OpenFOAM require a certain directory structure containing control files. Navigate to the cavity folder and type ls -R
or tree
to get an overview.
cd $FOAM_RUN/tutorials/incompressible/icoFoam/cavity/
tree
.
├── 0
│ ├── p
│ └── U
├── constant
│ └── transportProperties
└── system
├── blockMeshDict
├── controlDict
├── fvSchemes
└── fvSolution
All tutorials have a system (control files for solvers and utilities), a constant (mesh, material properties), and a 0 (zero; technically, the initial time folder could have any value/name but 0 is the most common scenario) directory (initial values, boundary conditions). If no further execution scripts are provided, you will always have to run blockMesh
, for the mesh creation, and afterward your solver of choice, in our case icoFoam
. In rare cases, there are one or two more dictionaries for preprocessing in the system folder (pre - they are executed before the solver). A possible scenario is an additional setFieldsDict to set initial field values. The corresponding utility to run after blockMesh
would be setFields
. The applications will give some output which should be saved in log files for later use (and to avoid that the terminal window is overflowing with solver output). &>
redirects the standard output and error messages of, for example, blockMesh to the file log.blockMesh. Now it’s time to run our first tutorial:
blockMesh &> log.blockMesh
# ... maybe some more preprocessing utilities
icoFoam &> log.icoFoam
Vector plot of cell-centered velocity colored by its magnitude. |
The reactingParcelFilmFoam
solver is, as one can guess from the name, a fairly complex application involving many physical models. Pre- and post-processing tasks for such simulations are correspondingly extensive. At this point, running every single application with its options would be too time (and nerve) consuming. Luckily, automating processes comes naturally within a Linux environment via Shell scripts. Basically, all necessary commands are written into a file which is then executed. In the tutorial collection, these scripts are usually called Allrun
. For convenience, different scripts can be created for subtasks, e.q. meshing or parallel execution. After the setup is complete, you may want to run a variety of simulations with different parameters. Here it comes in handy to have an Allclean
script, which resets the case to its initial state. All of this you can find in the hotBoxes tutorial.
cd $FOAM_RUN/tutorials/lagrangian/reactingParcelFilmFoam/hotBoxes
tree -L 1
.
├── 0.org
├── Allclean
├── Allrun
├── Allrun-parallel
├── Allrun.pre
├── constant
...
└── system
Running the tutorial in serial takes about 24h. So it’s wise to run it overnight or/and to use the Allrun-parallel
script, which runs the solver with four processes in parallel (about 9h to complete on my office laptop).
./Allrun
The surface color indicates the thickness of the cooling film. The Lagrangian particles’ diameters scale with the mass they carry. |
The last type of tutorials I want to introduce here need system operations. System operations basically means that an application (e.g., a solver) compiles and (hopefully) runs user-supplied C++ source code at runtime. Examples are the #codeStream directive or the codedFixedValue boundary condition (same link as before). Since the OpenFOAM 2.3.1 release, system calls are allowed by default. If you run an older version or you want to check your configuration, open the system-wide controlDict and set the allowSystemOperations switch to 1.
# for a system-wide installation root privileges are required
# e.g on Ubuntu run
sudo gedit $FOAM_ETC/controlDict
// and set the allowSystemOperations switch to 1
InfoSwitches
{
...
// Allow case-supplied C++ code (#codeStream, codedFixedValue)
allowSystemOperations 1;
}
Now we are ready to simulate the potential flow around a cylinder. This case is very charming because it allows us to validate our numerical results with an analytical solution. Within the case’s controlDict a coded function object is supplied which later on calculates the numerical error as defined in the picture below. So let’s run the simulation!
cd $FOAM_RUN/tutorials/basic/potentialFoam/cylinder
blockMesh &>log.blockMesh
potentialFoam &>log.potentialFoam
Here is a task for you:
The color of the streamlines indicates the relative difference between numerical and analytical solution. |
That’s it for this tutorial! With the above information, you are prepared to explore all the tutorials coming with OpenFOAM.
Cheers, Andre
]]>